

What you need:
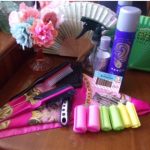
To set:
Sponge rollers in different sizes. The largest I use are about 1”Setting lotion. I have transferred mine into a spray bottle to make it easier to apply
Hair brush
Tail comb for sectioning your hair
A large square scarf
To brush out:
Hair brush
Back combing comb or brush (also works for smoothing)
Sectioning clips
Bobby pins
Hairspray
Setting your hair in rollers
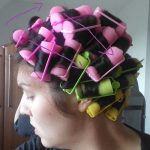
Start with damp hair. You don’t want it too wet so it won’t dry, but your hair drying on the rollers is what will give the curls hold. You will need to experiment with what works for your hair.
Use a tail comb to create a neat side parting. Apply setting lotion throughout your hair and reapply as you roll to make sure it is distributed all through your hair. Then start rolling your hair from the front and top of your head going backwards. Then roll the rest of your hair down the sides. Take small sections, the smaller the sections, the better your hair will dry and the tighter your curls will be. Make sure the ends of your hair are rolled in and not sticking out. You want the ends of your hair neatly curled to avoid frizz. Also take care to roll your hair neatly on to the rollers as it can be hard to take them out if your hair gets tangled into the clips! I always use the bigger rollers on the top layers of my hair and gradually use smaller rollers as I go down and I always try to make sure that there are no gaps between the rollers as this makes it so much more comfortable to sleep on!
It will take a few attempts before you learn what works for your hair. It all depends on your hair type, how much hair you’ve got and how thick it is how many and what size rollers you need. I need quite a few as my hair is very thick! You will also need to experiment with how wet your hair can be and how much setting lotion you need.
Aside from using sponge rollers there are also many other options available that you might want to experiment with if you find that you are not getting the result you want. For wet sets there are also bendy rollers and pillow rollers, but you can also use heat methods such as curling tongs or hot rollers. The advantage of using heat is that it is quicker – you don’t have to set your hair the night before! The disadvantage is that your curls tend to fall out quicker.
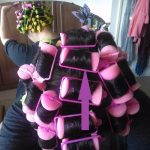
Covering your rollers with a scarf
To protect your rollers while sleeping cover them with a scarf. Fold your scarf diagonally into a triangle and place it over your rollers with the fold at the back and the pointy end towards your face. Bring up the sides and tie it either behind or in front of the front roller, then make a neat knot or bow and fold in the bits sticking up.
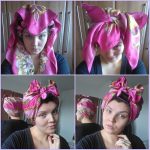
Brushing out your set
The trick to achieving vintage styles is to get tight curls, which you are then able to brush out and sculpt without loosing the curl.
Stage 1

Unroll the rollers carefully, starting from the bottom and work your way up to the top of your head. You will end up with tight bouncy curls.
Stage 2
Start by separating your curls a bit with your fingers as that will make brushing it easier. Then brush through your hair. It might seem hopeless at this stage, but just keep brushing! 🙂
Stage 3

Back comb your roots for extra volume. Back comb the front section until it stands up on its own. Don’t panic if you look like a cave woman at this stage – the wilder the better!
Stage 4
Now start smoothing your hair down, being careful not to undo too much of the back combing. Use a brush and/or your fingers and use sectioning clips to sculpt the front swoop. Also use sectioning clips all round your head where the curls start to create a smooth back. I normally use bobby pins to pin my hair behind one ear at this stage. Continue to use a brush and your hands to sculpt the curls into your desired style. The heat of your hand will help mould your curls into shape. When you’re happy, use hairspray and take the clips out when dry.
Don’t be disheartened if don’t achieve the look you were hoping for at your first try. As with everything practice makes perfect! It has taken me a lot of failed attempts to figure out how to get a look I’m happy with!